
DOWNLOAD INSTRUCTIONS
Don’t have time to download?
Instructions for all Plum Island Transfer Products are below.
UNDERGLAZE TRANSFER INSTRUCTIONS
Soft, Medium and Leather Hard Clay (Level of Difficulty: Easy)
Apply the tissue transfer to clay by either rolling it with a brayer or burnishing lightly with a soft rubber rib. The red and yellow Sherrill Mudtools Polymer Ribs work great for burnishing. This first step helps to keep the transfer from smearing later on.
Once applied, very lightly rub with your finger or sponge the backside of the transfer with water if needed. If the clay or slip is on the wetter side, you don’t need to sponge with water – burnishing with a soft rubber rib or rubbing with your finger is enough to transfer the image.
NOTE: Do not mist the ink side of the tissue transfer.
Keep in mind that tissue transfers are somewhat fragile and will tear if you get them too wet or burnish too hard.
Stop burnishing or sponging if you start to see the transfer smearing and wait a little longer for the clay and transfer to lose some of its moisture before continuing.
Once the tissue transfer is fully transferred, gently peel away the transfer until the entire image is revealed. If the transfer tears during this step, it usually comes off with the help of an exacto knife or pin tool.
Finally, touch up where needed with a matching underglaze using a small brush.
Be aware that you are going to get some folding and wrinkling in places as you apply the transfer to your clay, especially around curves if your piece is already formed. That folding and wrinkling is part of the process and creates a look that can be one of the highlights of the image transfer technique.
Tissue transfers are meant to be used directly on bare clay, or on clay that has been painted with 1 or 2 coats of slip or underglaze. Let the slip or underglaze dry to a dull sheen before transferring. Do not use anything on the tissue transfer other than a light mist of water or a slightly damp sponge on the backside when transferring.
Bone Dry Clay or Bisque (Level of Difficulty: Medium)
You can also apply tissue transfers to bone dry clay or bisque by wetting the clay first before rubbing them down with your finger and very lightly sponging and burnishing the backside if needed.
PLEASE NOTE: The white transfers transfer a little differently than the other colors. They are lighter in appearance and more subtle when fired.
PLEASE NOTE: It is not recommended to sponge or rinse bisqued pieces as some of the transfers can still smear at this stage.
STENCIL INSTRUCTIONS
TEXTURE: To add texture to clay, roll out a slab and apply the stencil to the clay by rolling it with a brayer, acrylic roller or rolling pin. Polycarbonate film is a flexible, thin material but thick enough to make a good impression, depending on how much pressure you apply when rolling the stencil onto the clay. Once adhered, gently lift one corner of the stencil using a pin tool or exacto knife, and then slowly peel off. Tap down or lightly smooth any areas that have sharp edges.
STENCIL PRINTING ON CLAY: Another effect you can achieve with stencils is “screen-printing”. Once the stencil is tacked down, you can virtually transfer the design onto the clay by painting the slab with either colored slips or underglazes. This process works best if the slip or underglaze is on the thicker side. If too thin, the underglaze or slip may seep underneath the stencil resulting in a messy print. If that happens, leave the slip or underglaze in the container without the lid for a few days in order to thicken it, then try again.
After painting the slip or underglaze on the clay, carefully remove the stencil. Let the slip or underglaze set up until it loses its glossy sheen and when you touch it, it no longer comes off on your finger. At that point, you can proceed with forming or hand-building your piece.
REVERSE PRINTING ON CLAY: If you want the opposite effect from the technique above, first paint your piece with underglaze or slip. Wait for it to lose its glossy sheen, then lightly roll the stencil onto the painted clay. If the color smears, wait a few more minutes to apply the stencil, then try again. Once adhered, start sponging off the exposed areas that have been painted with color. The more you sponge, the “cleaner” and “deeper” those areas become. When you are satisfied with the look, carefully peel off the stencil. Not only will you get the printed outline of the stencil from this type of application, but also depth and/or texture in the areas that have been sponged.
WATER ABRASION: Water abrasion is a technique that works well with stencils. When the clay is in the medium to medium-hard stage, sponge the piece enough to add a little moisture so that the stencil sticks better. Once the stencil is in place, keep sponging away the clay that isn’t covered by the stencil, keeping in mind that the area that is sponged recedes, whereas the area under the stencil remains raised. It’s best to keep rotating and rinsing out the sponge as you go in order to remove enough material to get the depth you want. You can also apply stencils to bone dry clay, but you might need to spray the stencil with a re-positionable type spray adhesive, and then use care when sponging since bone dry clay is quite fragile.
CARE: Gently wash or rinse stencils with water after using and pat dry with a towel or leave out on a counter to air dry. The .005” material can tear so be aware. Store flat and in a dry area. Do not bend. Stencils are re-usable and can last indefinitely if properly cared for.
USING RUBBER MATS
Make sure to use clay that isn’t too wet.
Brush cornstarch or spray PAM or WD-40 on the rubber mat before using to avoid sticking to the clay.
Use even pressure with a rolling pin when pressing the rubber mat into clay. Start in the middle and roll up then down lightly, then continue rolling adding more pressure as you go. Be sure to pay extra attention to the
edges of the mat and the top and bottom.Check out a couple of videos on Plum Island Transfers’ website that demonstrate rolling these mats into clay:
www.plumislandtransfers.com/videos.Keep in mind that using rubber mats takes some practice but the effort will be well worth it!
USING VINYL TEMPLATES
A Pin Tool works best when cutting out the shapes on clay.
Lay the more “frosted side” of the template down on the clay as it will stick less than the shinier side. Let your clay set up a bit before using the templates as they can still stick to very wet clay.
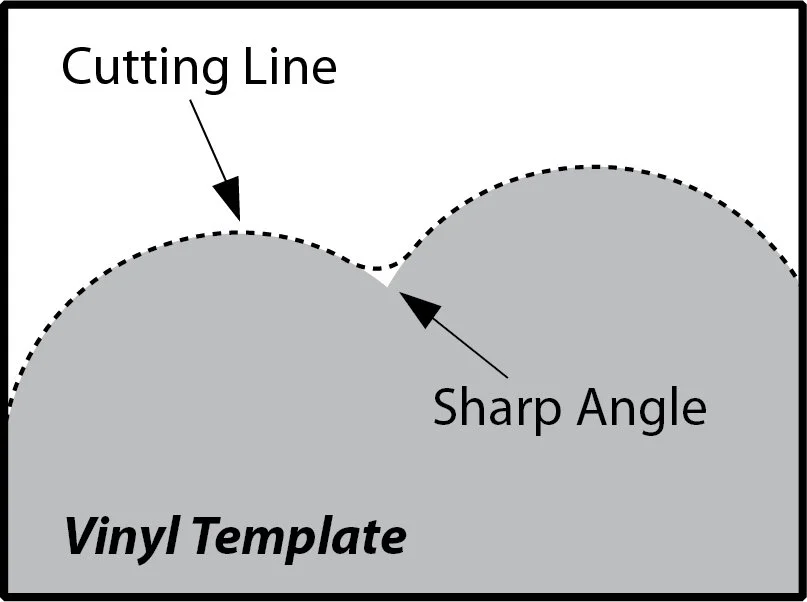
Instead of cutting a “V” where two curves meet at a sharp angle, cut a “U” in a continuous motion as shown in the illustration. Sharp “V” cuts in clay will most definitely crack later on. You can always go back with a finger or a rubber tipped tool and make the transition a little more pronounced.
Rigid Vinyl templates can last indefinitely if properly cared for. They can be washed with soap and water and used again and again. They are made of a durable material that can stand up to wear, but can potentially tear if pulled on deliberately.
Please Note: Sometimes the template cutter leaves a slightly rough edge which can easily be smoothed out by lightly sanding with sandpaper.
USING WOODEN STAMPS
Roll the clay to an even thickness, then lightly brush cornstarch onto both the clay surface and the wooden stamp to prevent sticking.
Press the stamp firmly into the clay with a gentle wiggle to create a clear, even impression, then lift it straight up. Use tools to refine or clean the edges if needed.
Timing matters. Stamp into moist clay for deeper texture, or wait until the clay is leather-hard for sharper, cleaner details before firing. If the clay is too soft, the design may distort; if it’s too dry, it will be difficult to achieve a good impression.
Practice makes perfect!